Salesforce CRM training tutorial for beginners (2023)
This salesforce CRM training tutorial is aimed at beginner and intermediate users, and assumes that you have access to either a free or a paid Salesforce account so that you can follow along and experiment the changes on your own Salesforce CRM and dashboards. By the end of this tutorial you will have a really good understanding of how to use Salesforce as your CRM software. We will specifically look at the following:
- Salesforce CRM overview
- Setup
- How to login into your Salesforce CRM
- Switching between the Salesforce Lightning Experperience and the Classic interfaces
- Important
- Leads
- Contacts
- Accounts
- Opportunities
- Setup
- Others
- Cases
- Tasks
- Calendar
- Reports
- Admin
- Viewing Audit Trails
- Bonus
- Using Global Actions effectively
Setup: Sign in via the login link:
Salesforce has so many different tools that it can be hard to find the one you want to use, but all of them have one login page - and you can access that by visiting the login link below.
Login to Salesforce
Once you are here, please fill in your username and password to login to Salesforce.
Setup: Selecting the Salesforce Sales CRM app:
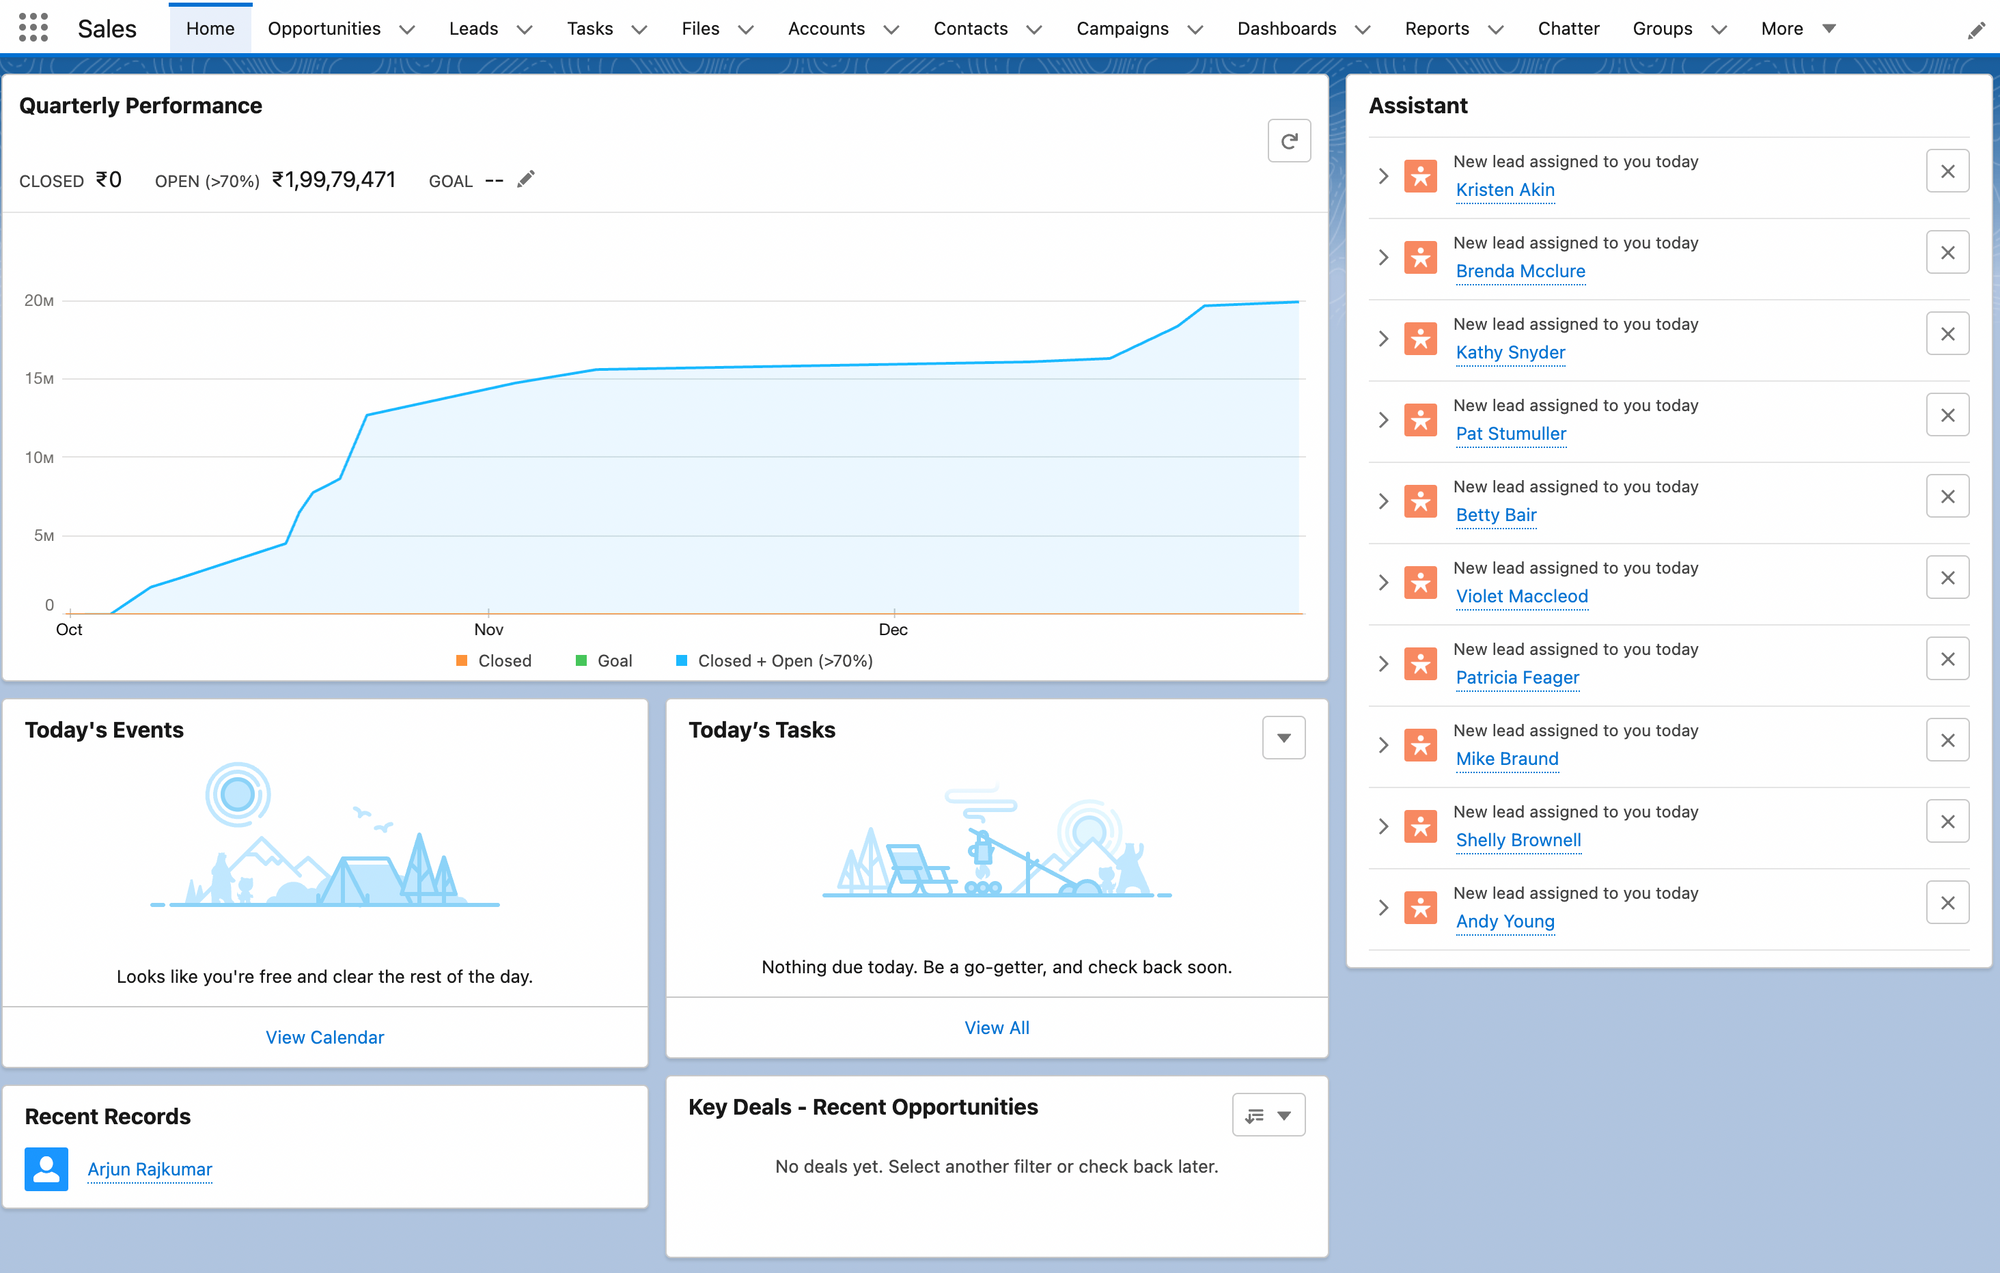
Once you login you will see all the different applications that are available for you. Salesforce has a lot of different apps under it, and you probably would have signed up just to use one. We are going to be focussing on the Sales app in this tutorial. If you are on the developer account, you can click on 'Sales' from the list of apps.

Depending on if you have leads and data in your account, you will either see a dashboard filled with information, or a blank screen.

Setup: Switching between Salesforce Lightning and Classic interfaces.
The classic interface is the older interface, and if you wish to switch between the two interfaces, you can do the following:

- Click on "View Profile" on the top right corner, and then click on "Switch to Salesforce Classic"
- To switch back to Lightning interface, click on your username on the top right, and then click on "Switch to Lightning Experience"
I would recommend that you get comfortable using the Lightning experience as it is the preferred default, and will be used more going forward.
Important: Leads
We are going to begin by looking at the most important tabs in a Salesforce CRM - i.e. the leads, accounts, contacts and opportunities.
Leads in Salesforce refers to people who have made enquiries with you. Leads are different from contacts. We will talk about Contacts later, but for now please note that there is a difference between contacts and leads in Salesforce. Suppose you buy a database of 2500 people, you could add those 2500 as leads. Leads are not qualified at all, and have a very low possibility of converting into a paid customer.

On the leads dashboard, you can view a list of all the leads - the name of the person, the company they work at, their contact details, what the status of the leads is, when it was created, and who in your team is responsible for it.
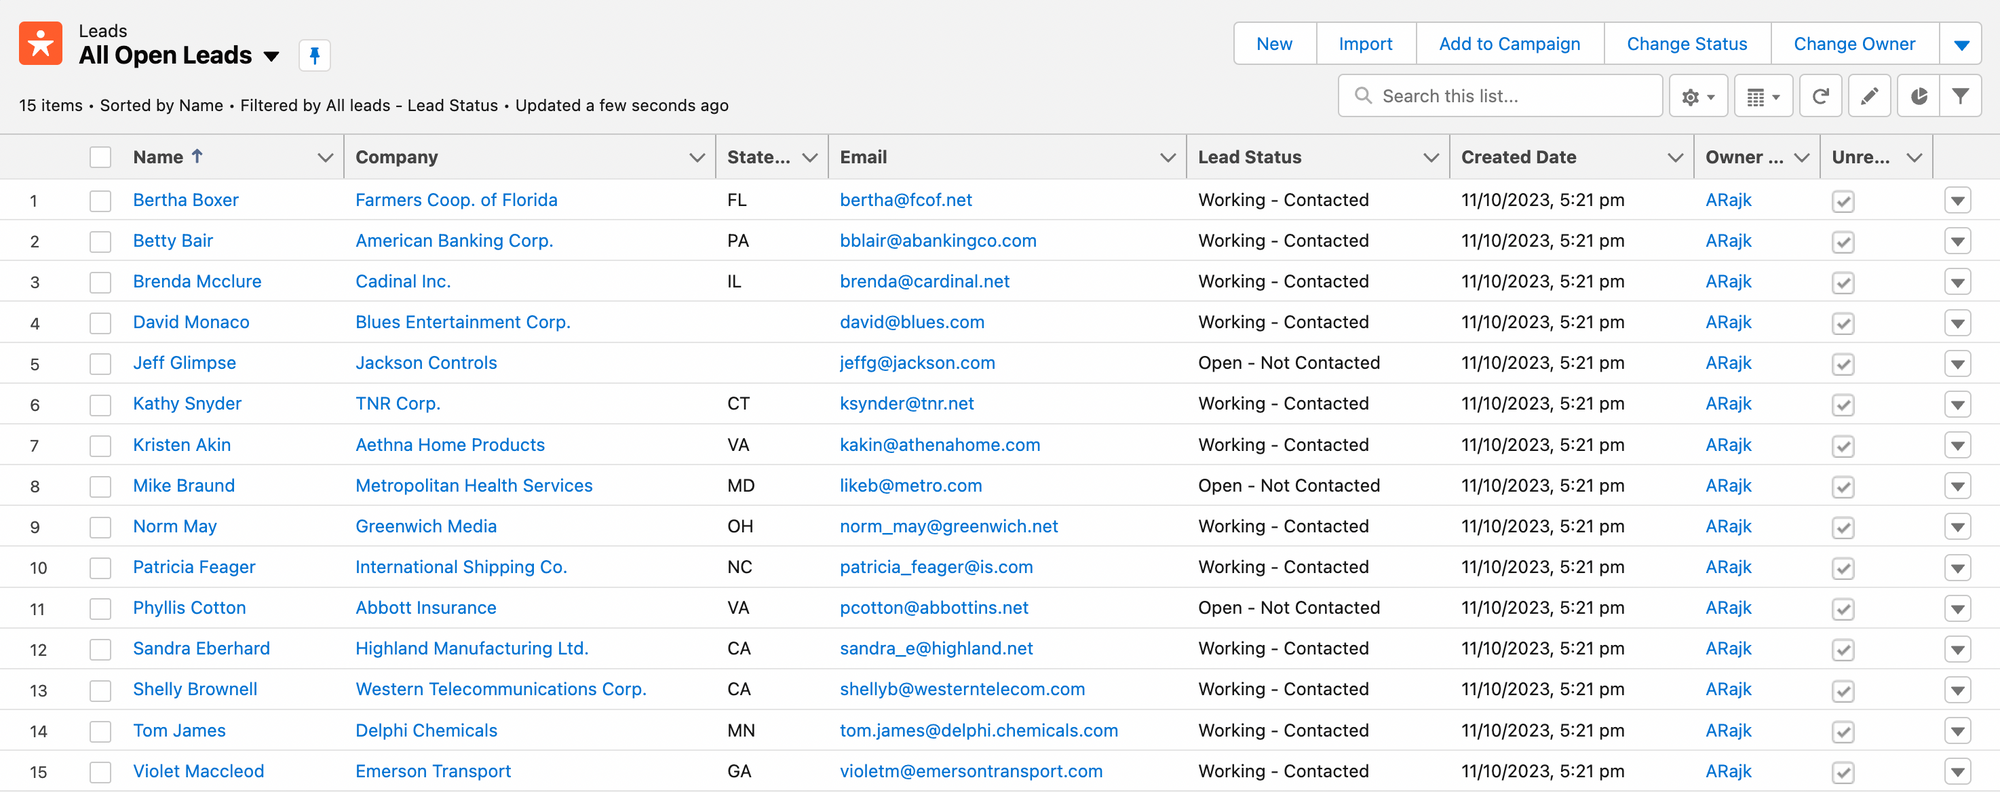
There are a few different ways to create a new lead - you can add them individually, or bulk import them. While adding a new lead, usually you will not have all the information. The important fields to fill are the name and company - and the lead status.

A lead can be in either of these statuses - Not contacted, Contacted, Closed, and Converted.
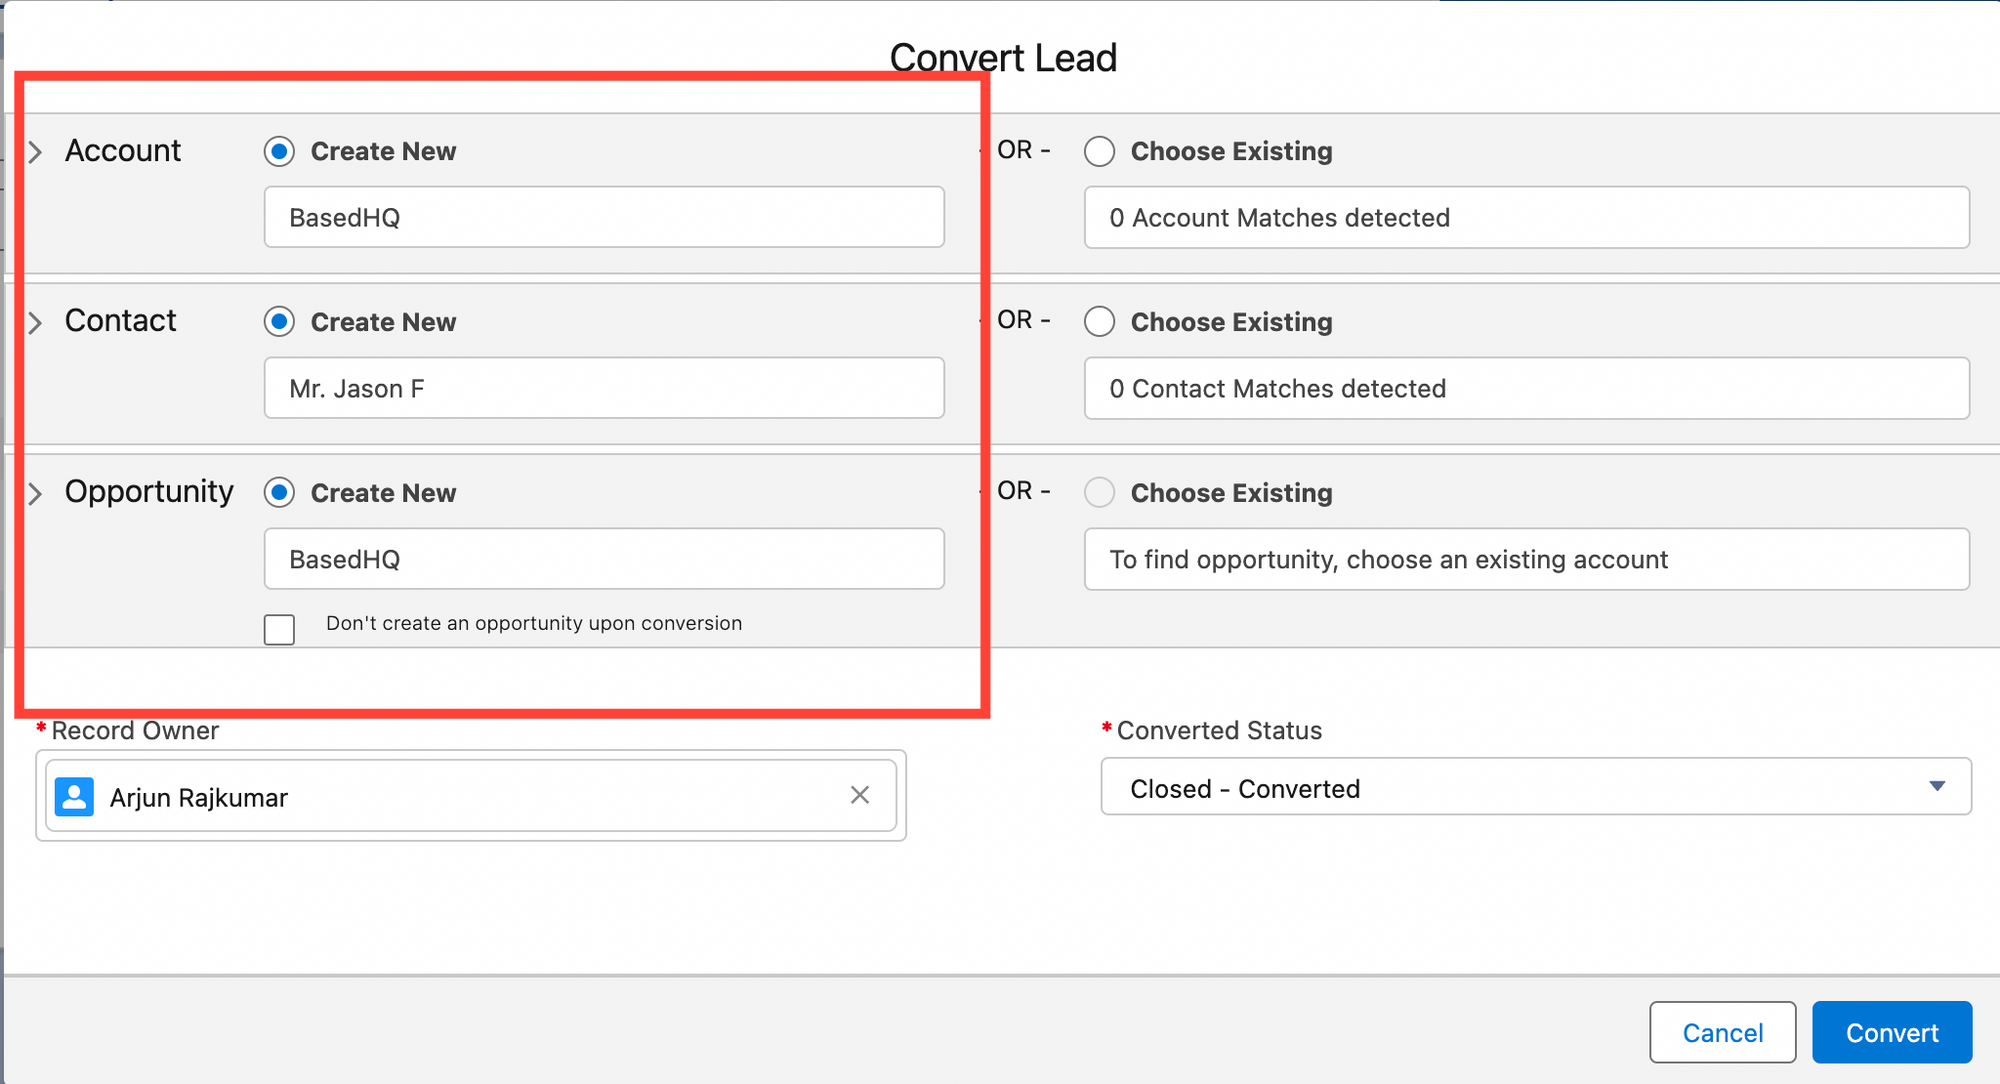
Suppose from the example above, after I received an enquiry from Jason F, I add his details as a lead - and keep the status as Open (Not contacted). Then, suppose I speak to the lead to gauge their interest - and if I feel that the lead has a possibility of being my customer, I convert the lead into a contact.

At this stage, while converting the lead into a contact, you will need to add the account details, contact and opportunity details (will explain this below), and also close the lead to a converted state.
Important: Contacts
Because you converted the lead, the lead will appear in the contacts tab. You can think of contacts as people who have a greater chance of converting into a customer. This is the first step of a CRM. In many cases, instead of adding a person as a lead, and then converting them into a contact, you may end up adding a contact directly.
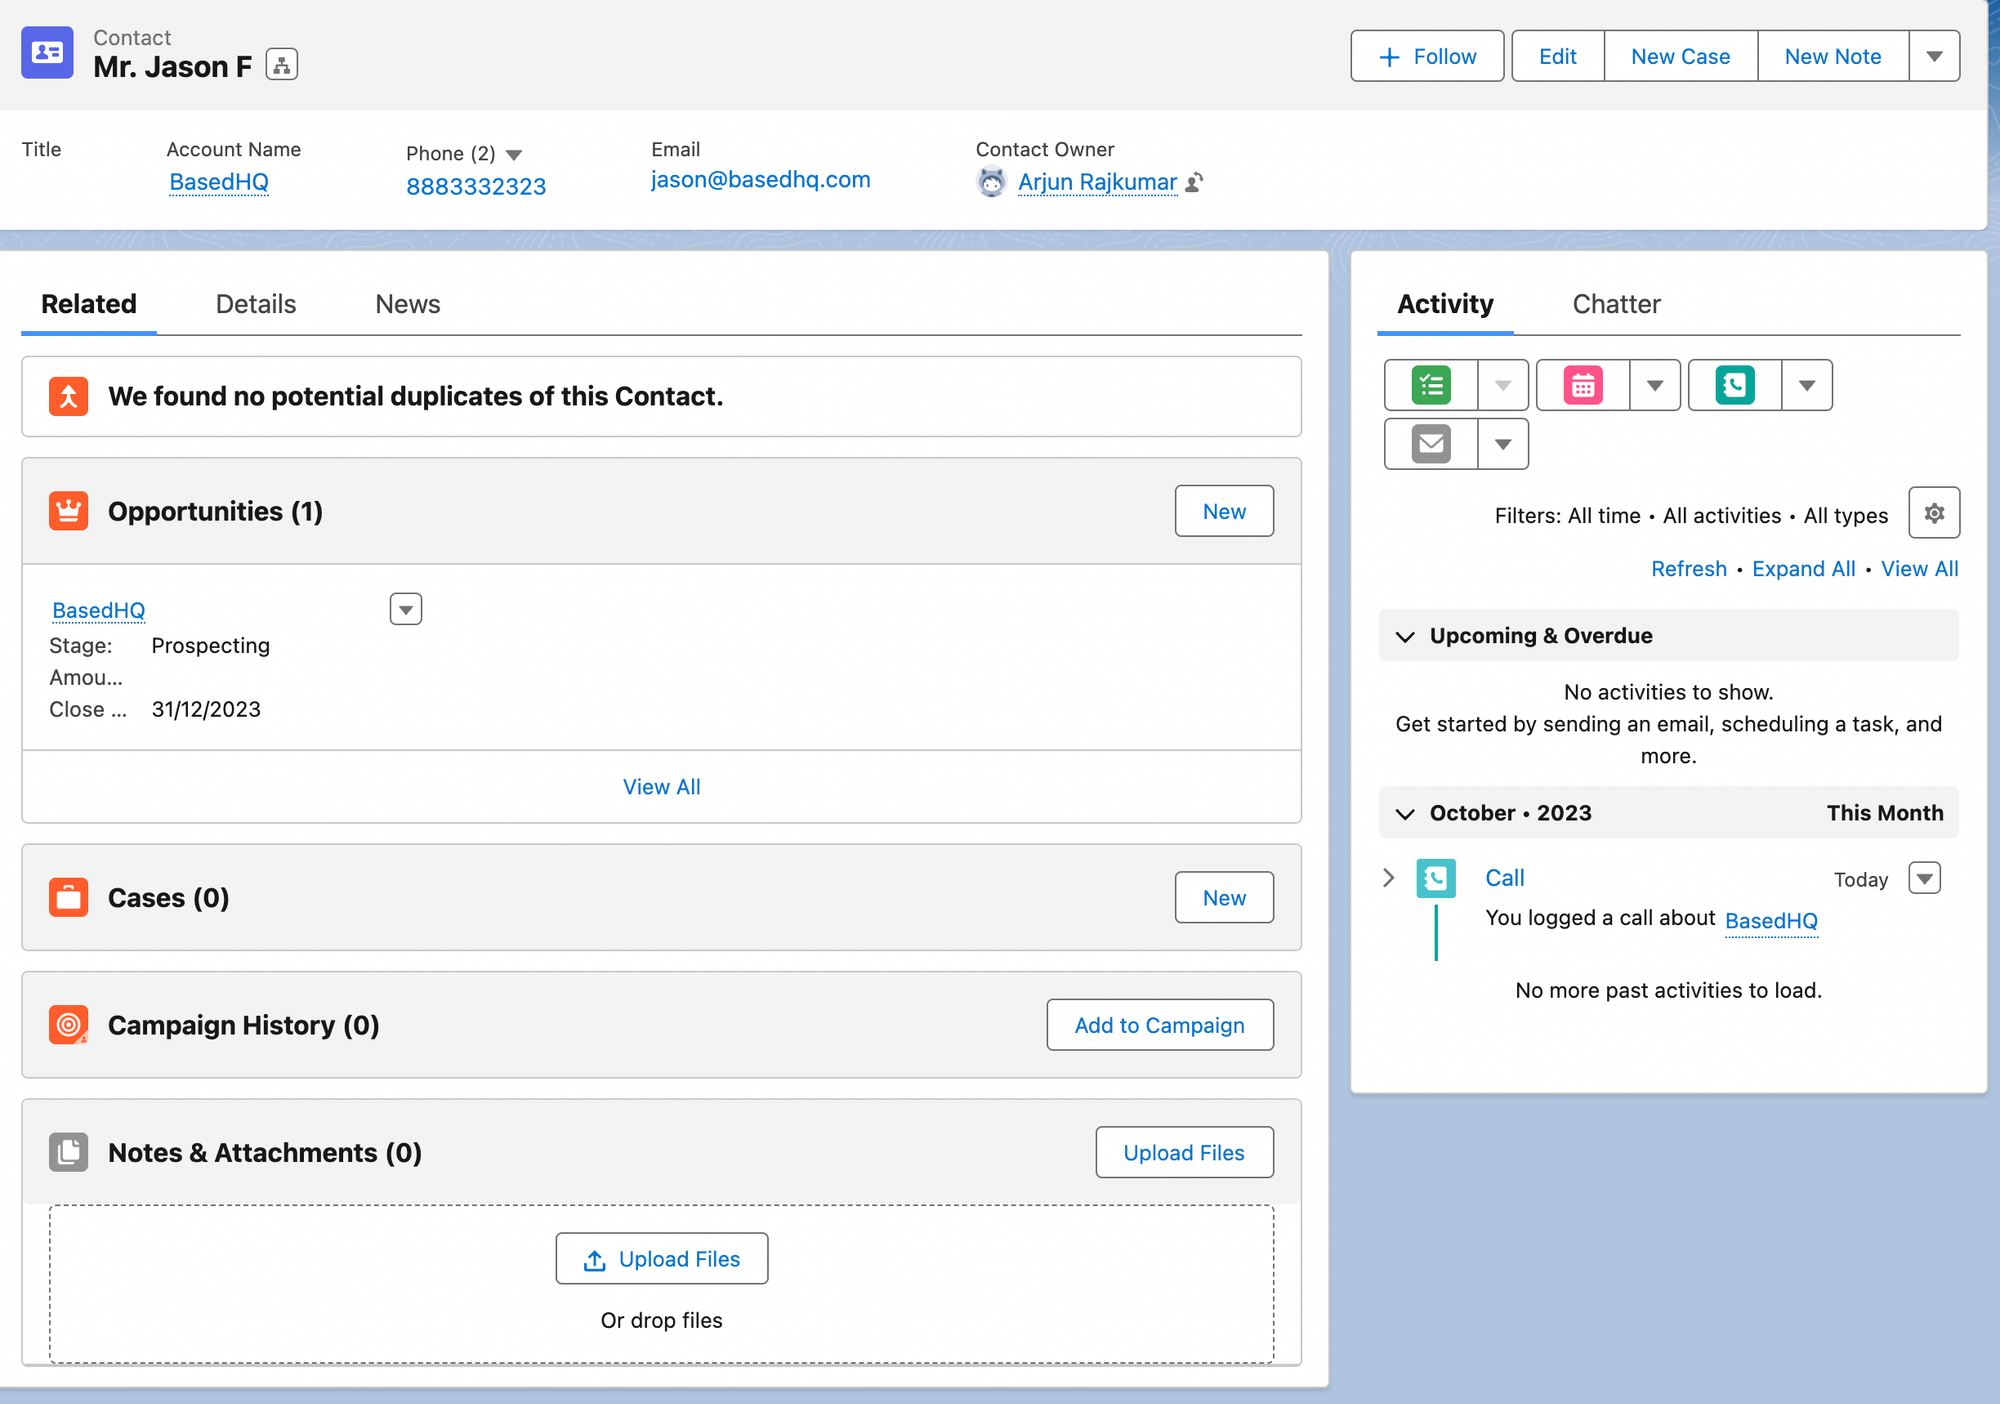
Because we converted Jason F to a converted state in the last step, you can see that Jason F, appears as a contact now. On this table you can also view the account (i.e. company Jason works at), Jason's contact details, and who is responsible for Jason.

This is the first stage of the CRM in most cases, as you will end up adding contacts directly (instead of adding them as a lead).
You can also click on the contact's name, to view more details regarding the contact. On this details page, you have an option to add notes, log calls, add emails etc related to this contact.
Important: Accounts
Each contact also belongs to an account. For example, when we added 'Jason F' as a lead, we also created an account (company) for Jason. Each contact belongs to one account, and an account can have many contacts. You can think of it like this : if you are selling software to Apple, you can add add Apple as the account, and the people you are talking to at Apple as the contacts under apple.
You can visit the account list view, by clicking on the account tab on top. The main things you will use and should get comfortable with are the "Filters" icon on the top right. This is super useful if you want to view all the accounts that someone specific in your team is responsible for, or to view all the accounts that were created in a different time period etc. For example, in the pic below you can see BasedHQ which is the account related to the lead we added earlier. In the picture below, I am viewing all the accounts that I am responsible for and were created after December 10, 2022 via filters.

From this same page, you can also create a new account, bulk import accounts, and select the different columns you want to see on the view. It is good getting comfortable with different columns, as you can make it tailored to your needs and it provides a lot of insights once you start collecting more data.

Important: Opportunities
By default when you visit the opportunities tab - by clicking on "Opportunities", you will only see the recently viewed items. If you have not viewed anything recently, this can appear as empty. Instead, you should change this by clicking on the dropdown next to "Recently viewed" and choosing "All opportunities". Filters and these views all the same across all tabs - opportunities, leads, accounts, contacts etc.
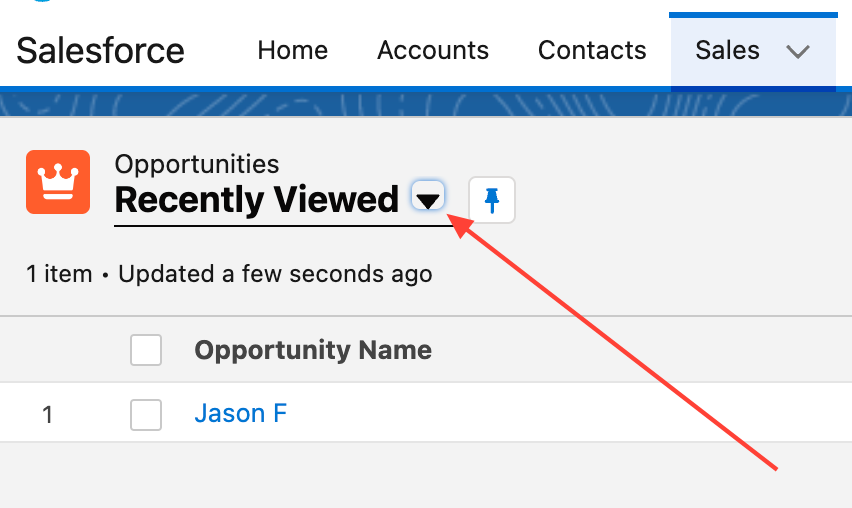
You can also choose to pin this view, so that this view will always remain the same when you visit it the next time. This will be the dashboard that you use the most when you are using Salesforce as a CRM, so it is good to get comfortable with the opportunity tab. You can use this to track the progression of contacts across different B2B sales pipeline stages.
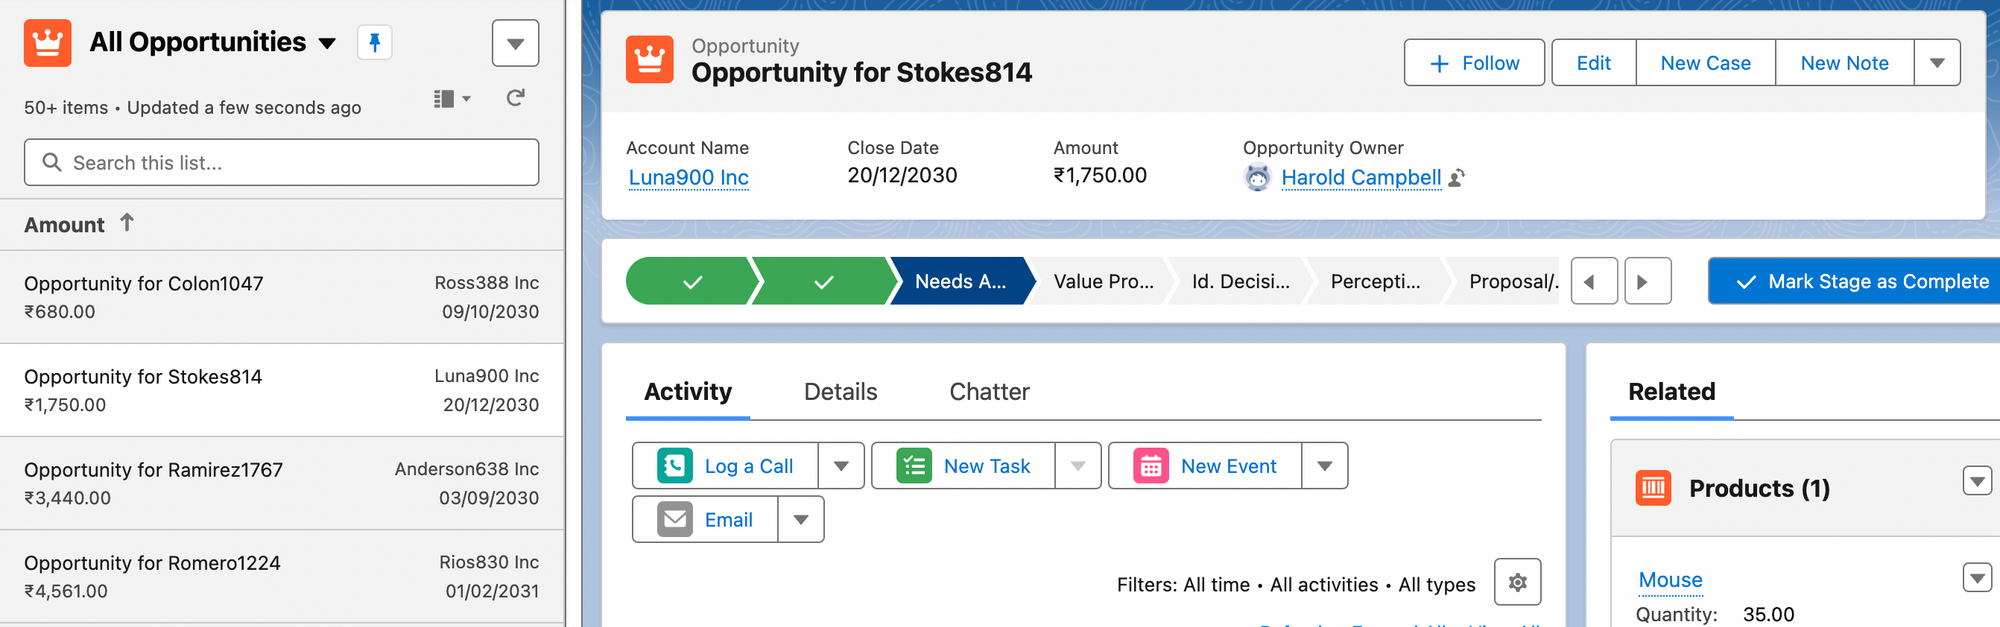
For example, below I can see the different stages that the opportinities are at. I can also see BasedHQ as an opportunity which I added when I converted the lead earlier.
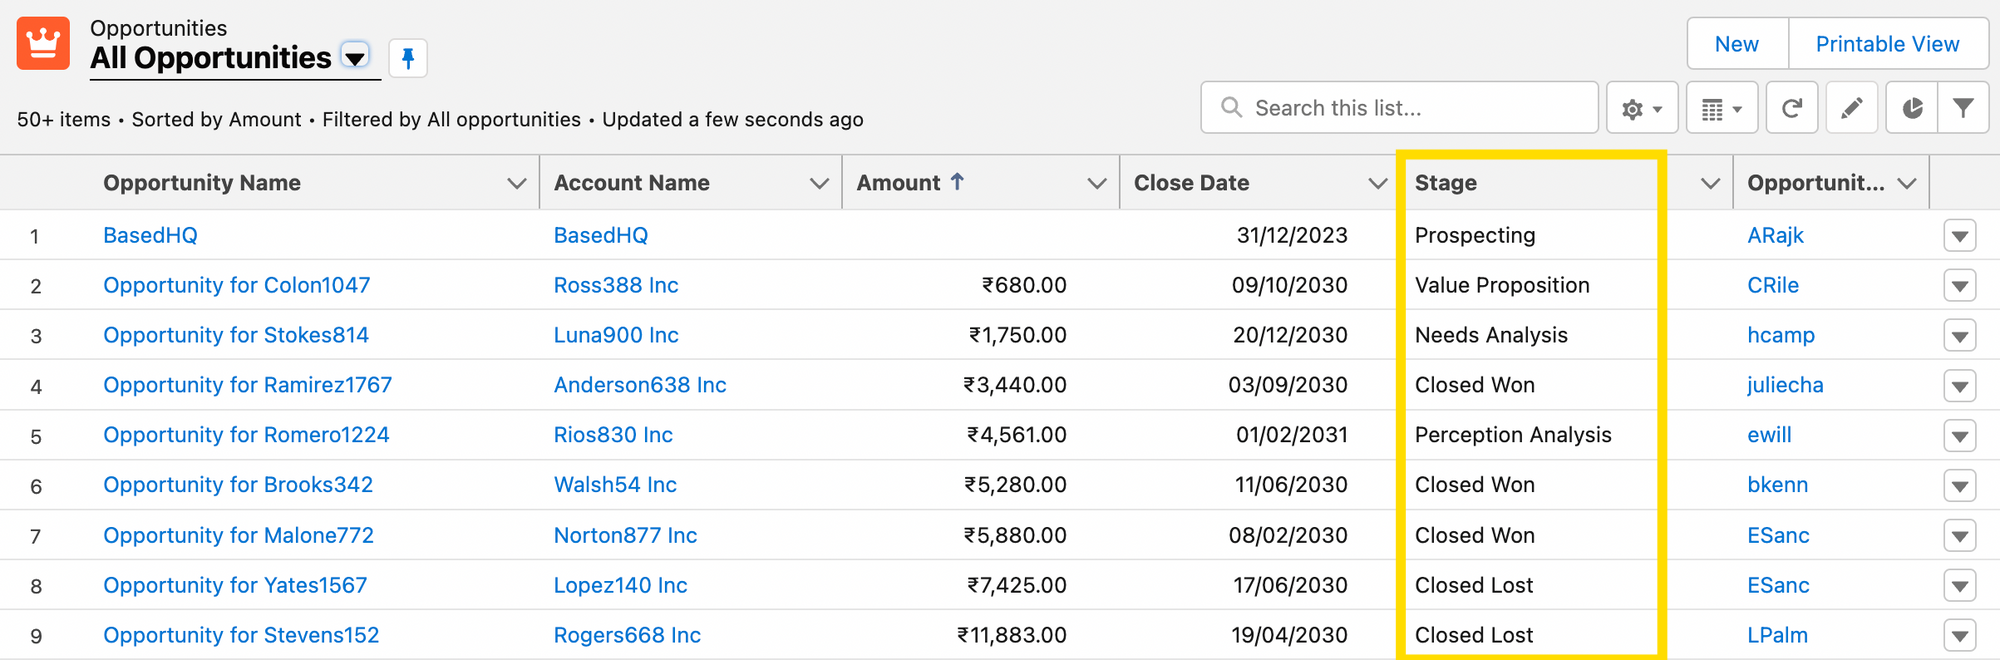
You can also see the opportunity name, and the account it belongs to, the amount of the deal, who is responsible for it, and the dates. If you want to see something specific about an opportunity, you can click on the "Opportunity Name" tab to see the details about it.
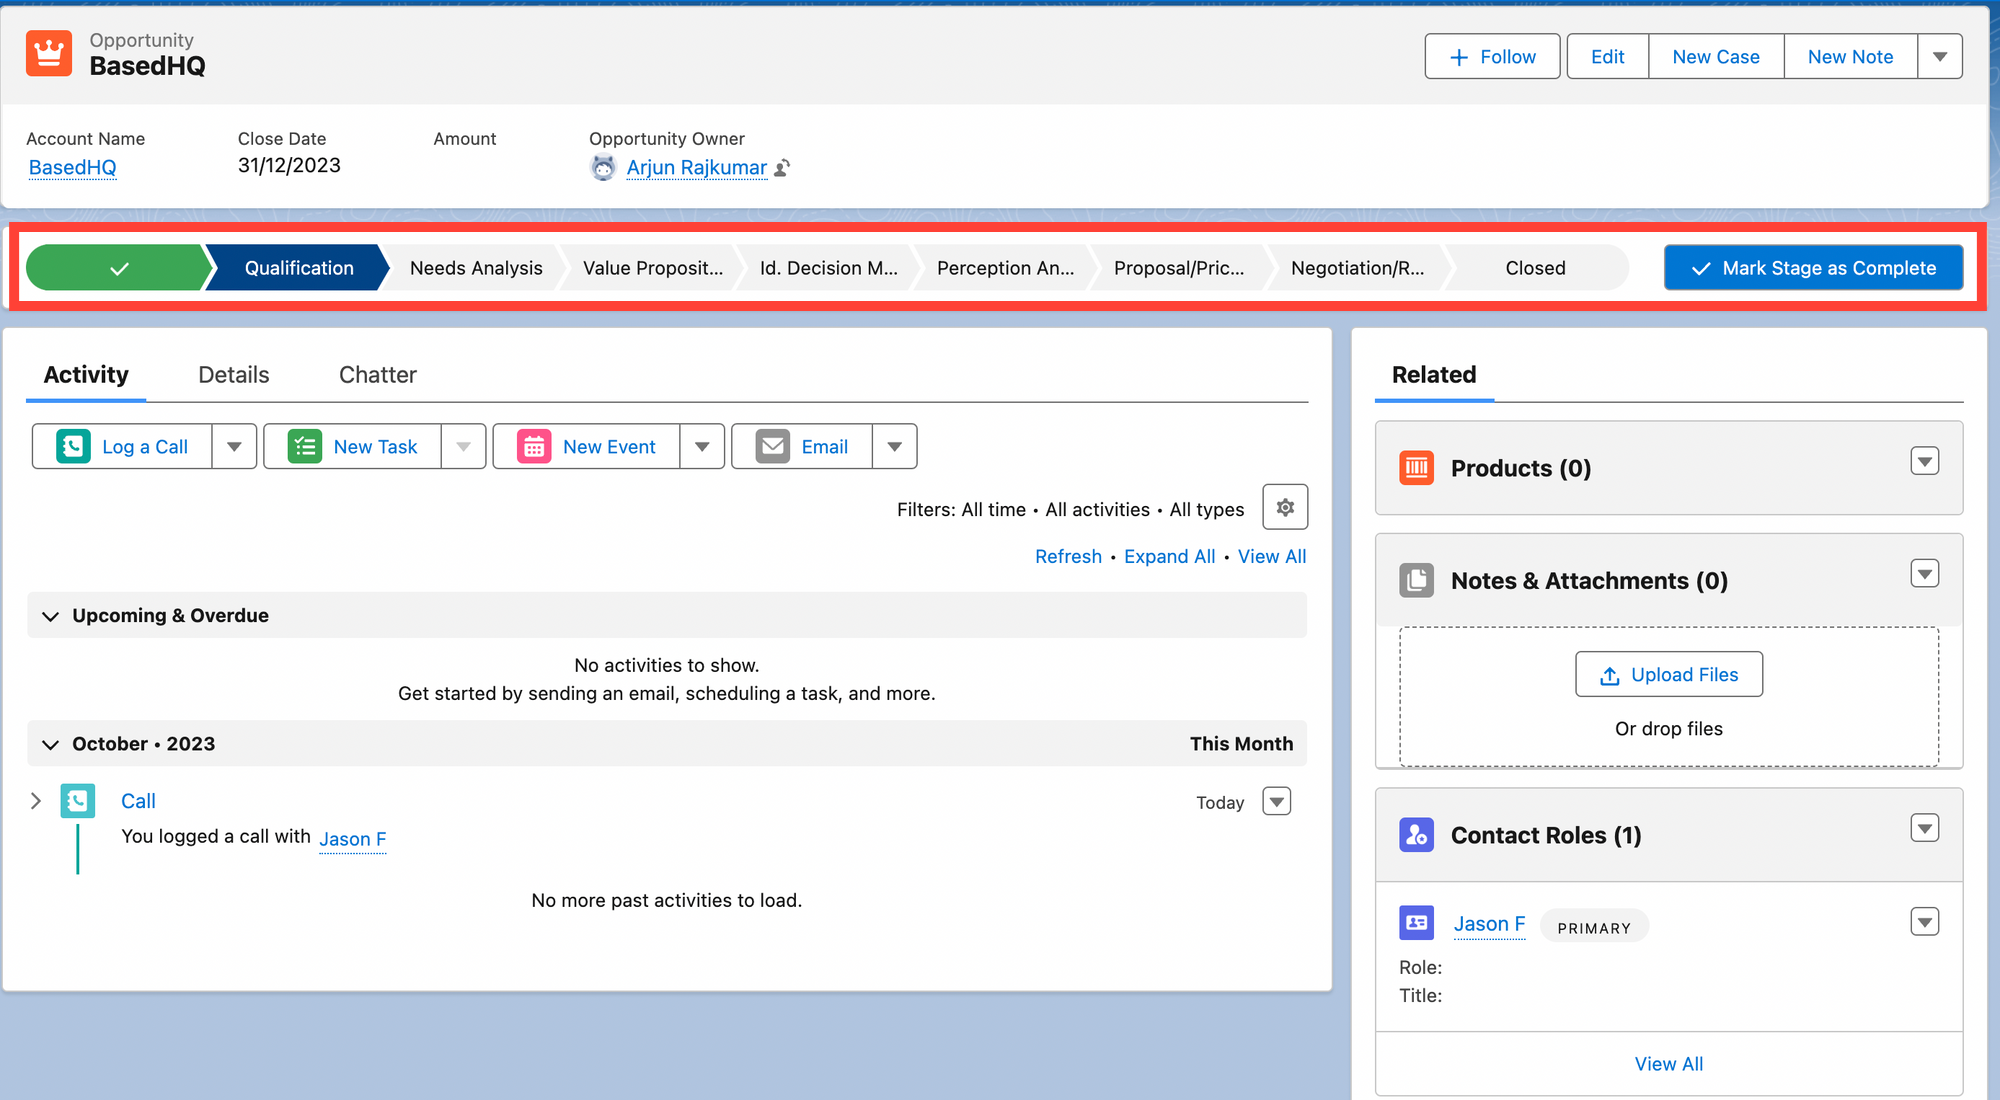
This is useful for seeing more details related to this specific opportunity. Over here you can see the current stage this opportunity is at "Qualification" stage. After you qualify, you can move to the next stage - Needs Analysis, and so on until you reach the last stage - and close the opportunity. The actual stages you enter will depend totally on your business. Please refer to this article on stages to get a better understanding on how to create stages.
While closing the opportunity, you can mark it as closed-won or closed-lost.

It is only after you mark it as closed, that the revenue generated or lost from the deal will be shown in the reports. Until then, it will be shown as pending.
You can create as many opportunities as you want for the same contact and the same account. For example, suppose you are selling your product to a business. You can create an opportunity which is associated to the business for buying your product - and add the related details like amount associated with this opportunity, the expected closed date, the current stage you're at etc. Now, suppose you are conducting an event, and you are looking for sponsors - you can again create a sponsorship opportunity and attach it to the same business. Now, this one business has two different, ongoing opportunities with you.
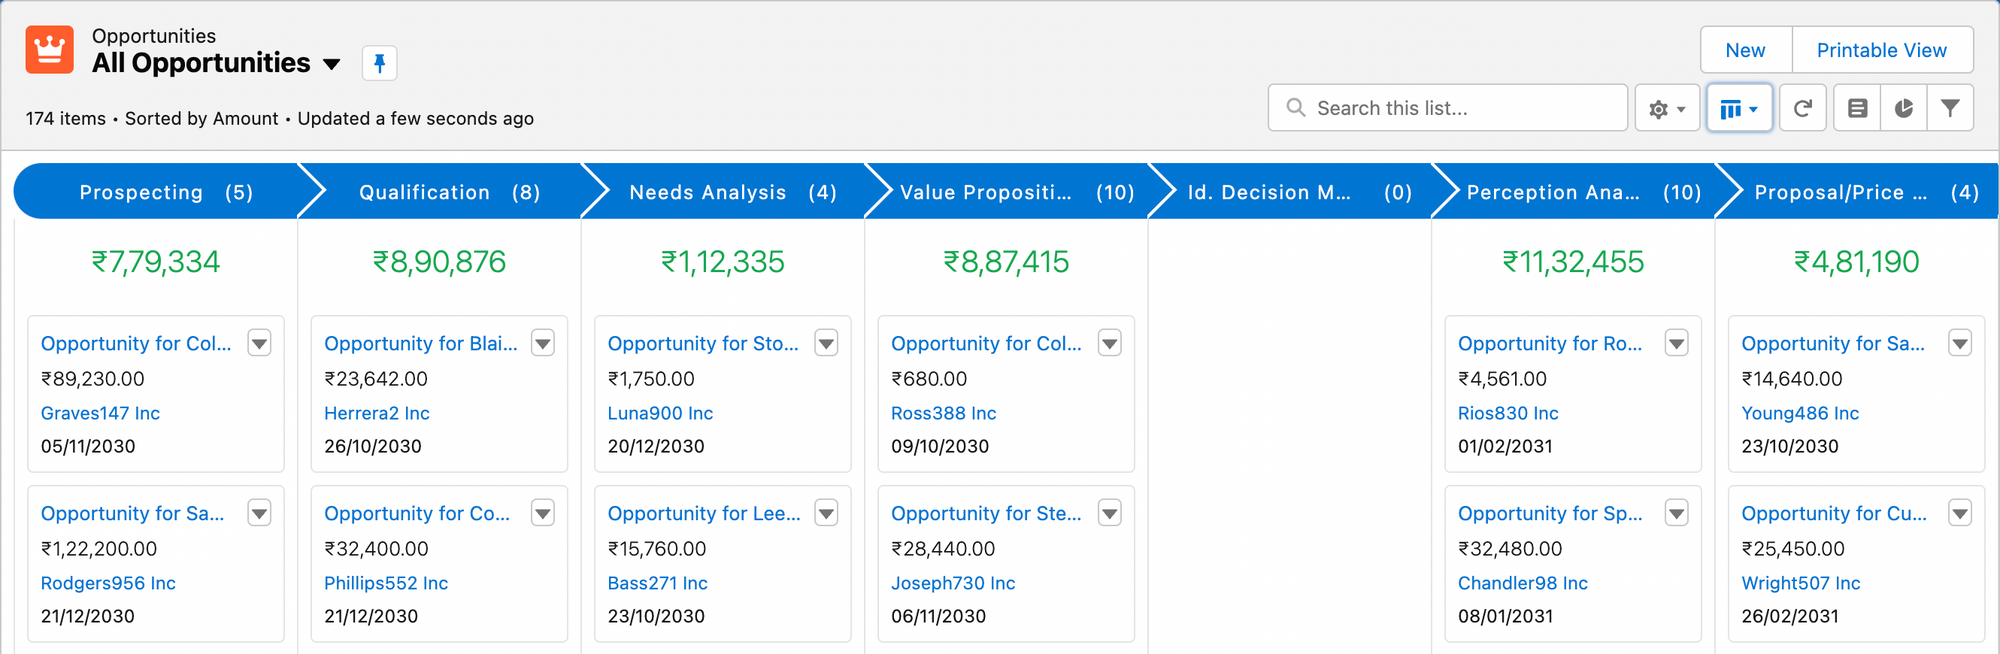
For example, along with the opportunity for BasedHQ I created when converting the lead, I also added a sponsorship opportunity for BasedHQ. You can see that both these opportunities are related to the same account - but have different amount, and are at different stages. I have used filters to view only the opportunities related to me.

You can also change the default view from the table view, to either the Kanban view or the split view. I prefer the table view and find it the most useful as I have more flexibility with filters to view a bunch of opportunities at once. I also like the Kanban view for the ease in which I can move an opportunity to a different stage.

Others: Cases, Tasks, Calendar, Reports
Apart from leads, contacts, opportunities and accounts discussed above - we will also take a quick look into cases, tasks, calendars and reports.
Tasks, calendars and reports are quite straightforward and do what you expect in any CRM. You can create a new task, assign it to a specific team mate, and view taks statuses easily from the tasks tab. Reports are really useful, and Salesforce has a good set of defaults to begin with.

Cases are another feature which you may end up using in Salesforce. Basically, you can assign a case to any contact, and a contact can have multiple cases. For example, lets say you are in the negotiation stage with a contact, and the contact has requested for additional information on the taxes related to the charges. In this instance, you can create a case - so that people are aware that the contact has requested this information.
Bonus: Understanding Global Actions
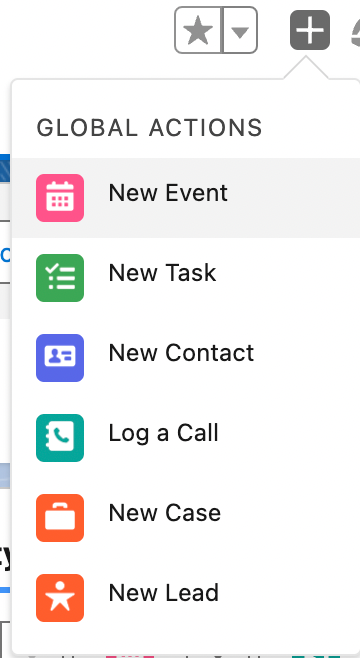
Global actions are super useful for doing specific actions like creating a new opportunity, logging calls, or evening sending emails, from any page on Salesforce.
For e.g. one of the main use cases of the Salesforce CRM is to also log calls that you take with a contact. When you click on the + icon on the top right, you will see the default "Global Actions" that are available to you such as "New contact", "Log a call", "New cases" etc.

Let's look at an example of logging a call when you are in the opportunities page. If you suddenly get a call from a contact, you can log that call by clicking on the + icon on the top right from any page, and then clicking on "Log a call". Then, another popup will appear where you can enter the details of the call, and assign it to a contact and account - like I have done in the example below.

This call log is saved, and then when anyone goes to view the same contact, they will see this call log in the activity.

Global actions are useful for quickly entering additional information about a lead. This is where I find ChatGPT useful. I can ask ChatGPT to help me with this in the following way, and it will give me the exact steps to follow.
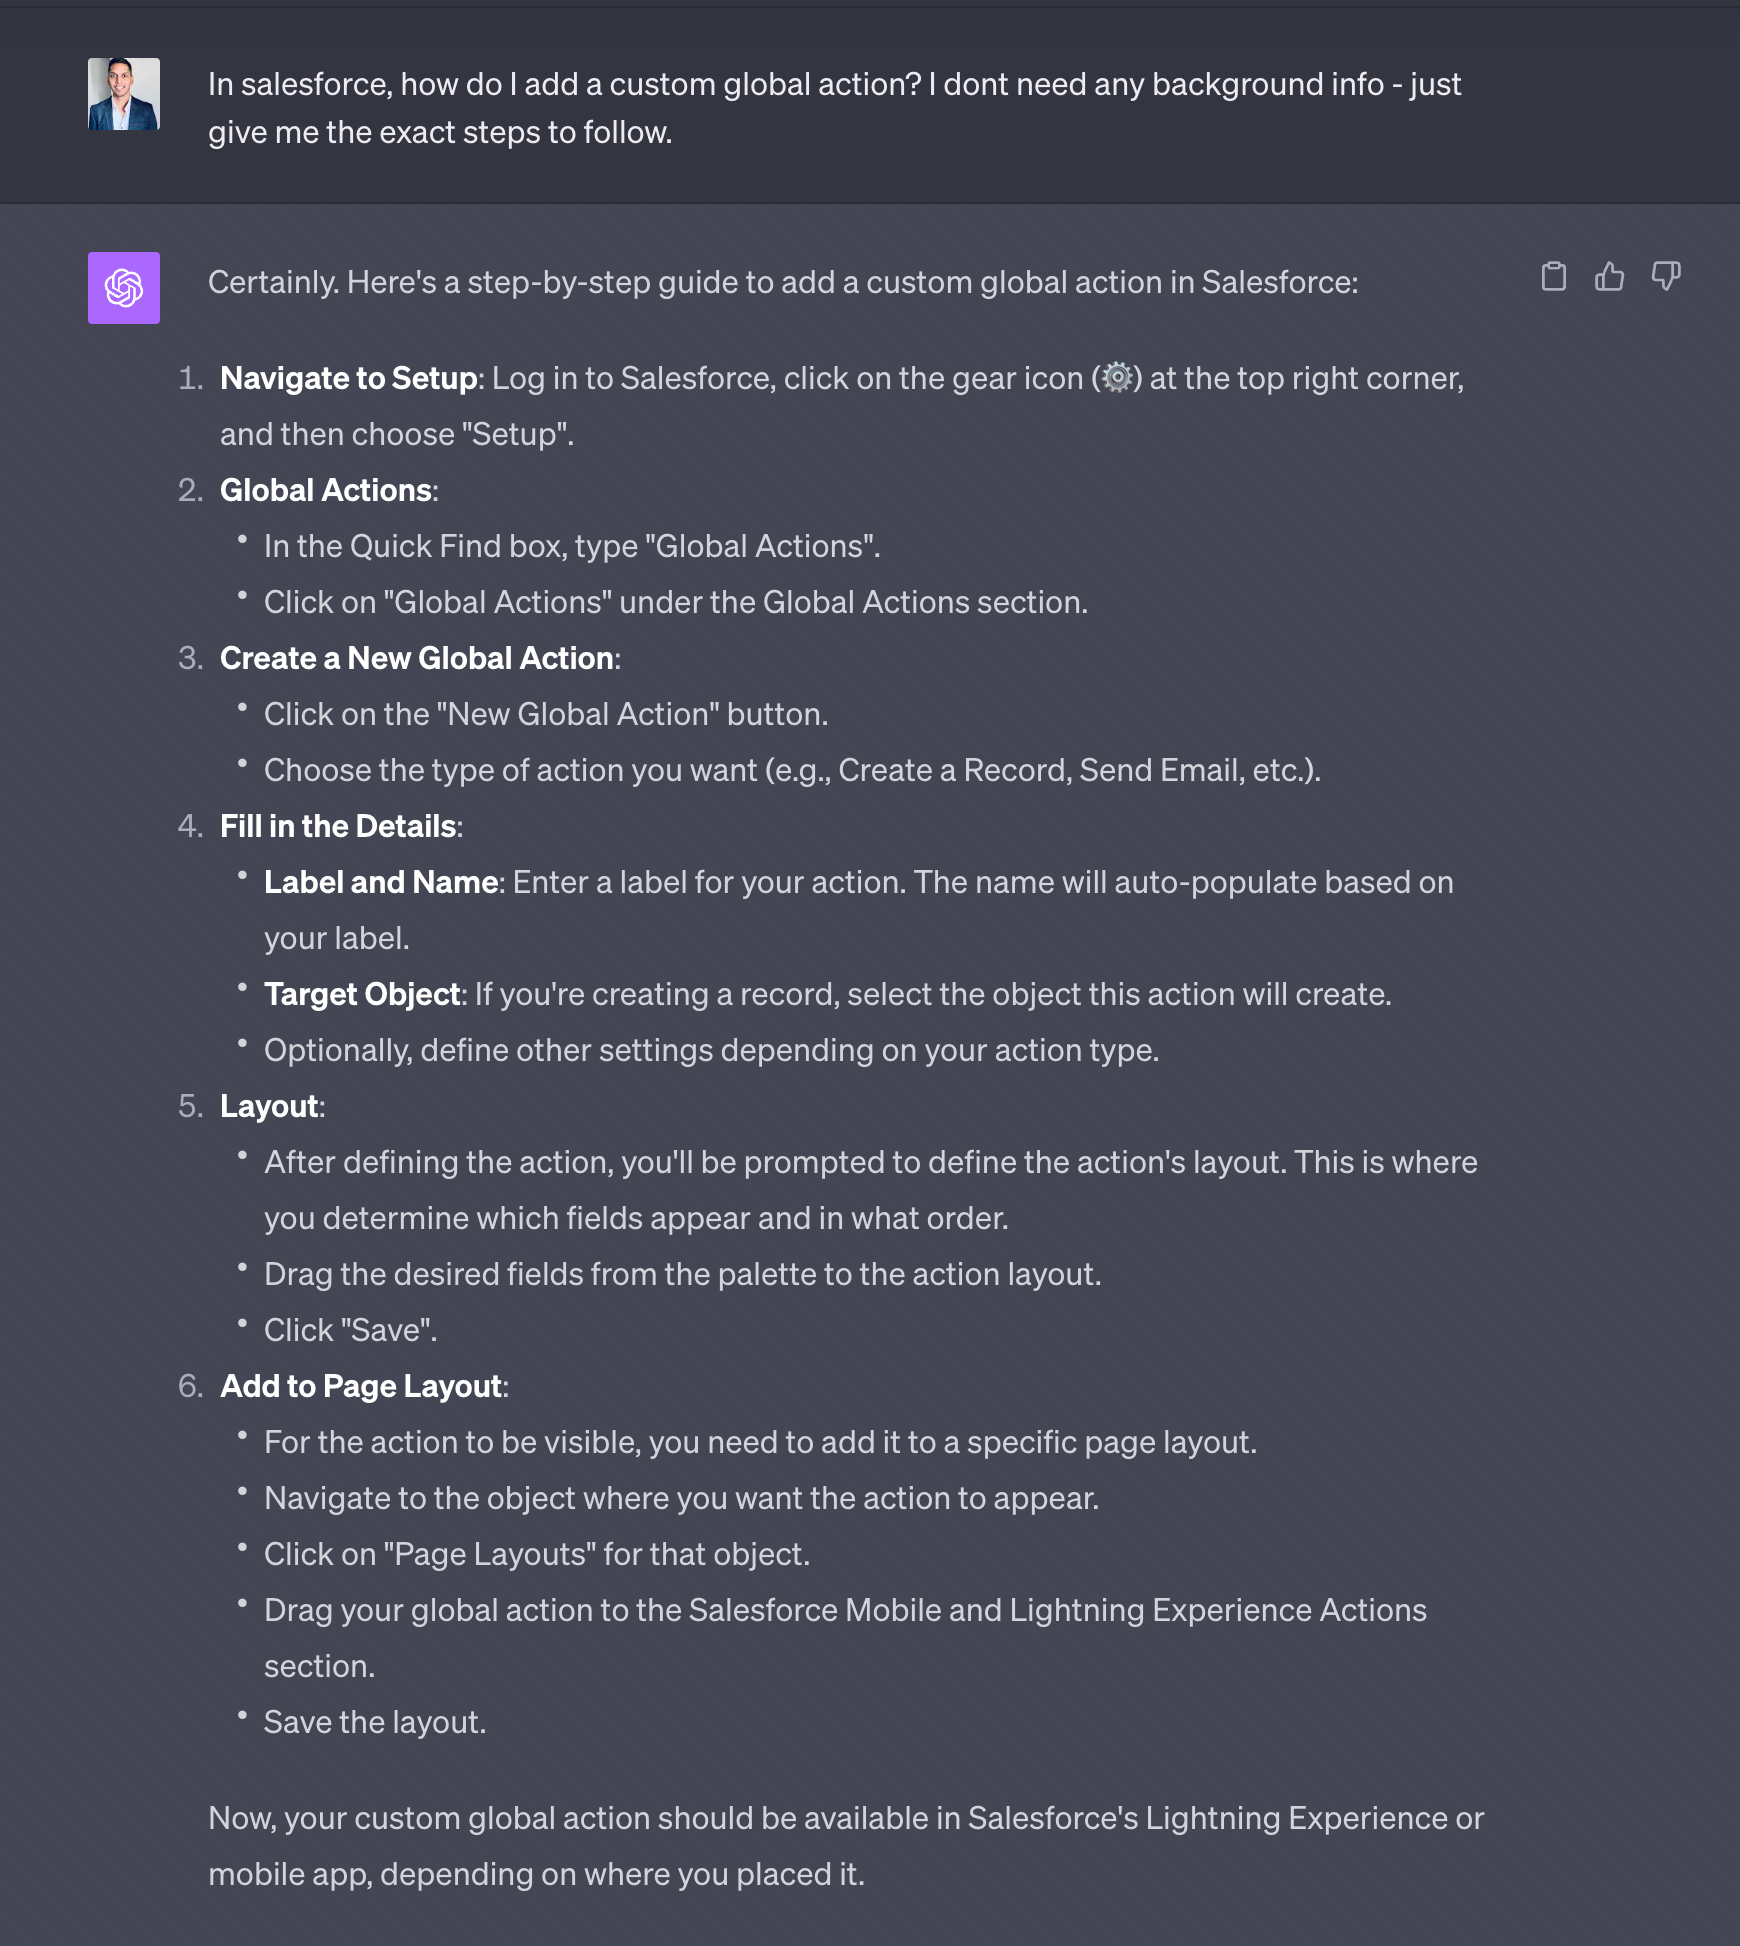
I would encourage you to do the same whenever you are stuck or need help with Salesforce. Asking chatGPT specific questions likes this is useful for quickly finding out how to do something on Salesforce.
Let's follow these steps to see how we can add "Send Email" as a Global action.
First, we are verifying that "Send email" is not present as a Global Action. You can see that when I click on the +icon, the "Send Email" is missing from the list of actions.
So, to add it - I first click on the settings gear icon on the top right, and then search for "Global Actions" in the search column. I then click on "Global Action" and I can see a list of global actions that are added already.
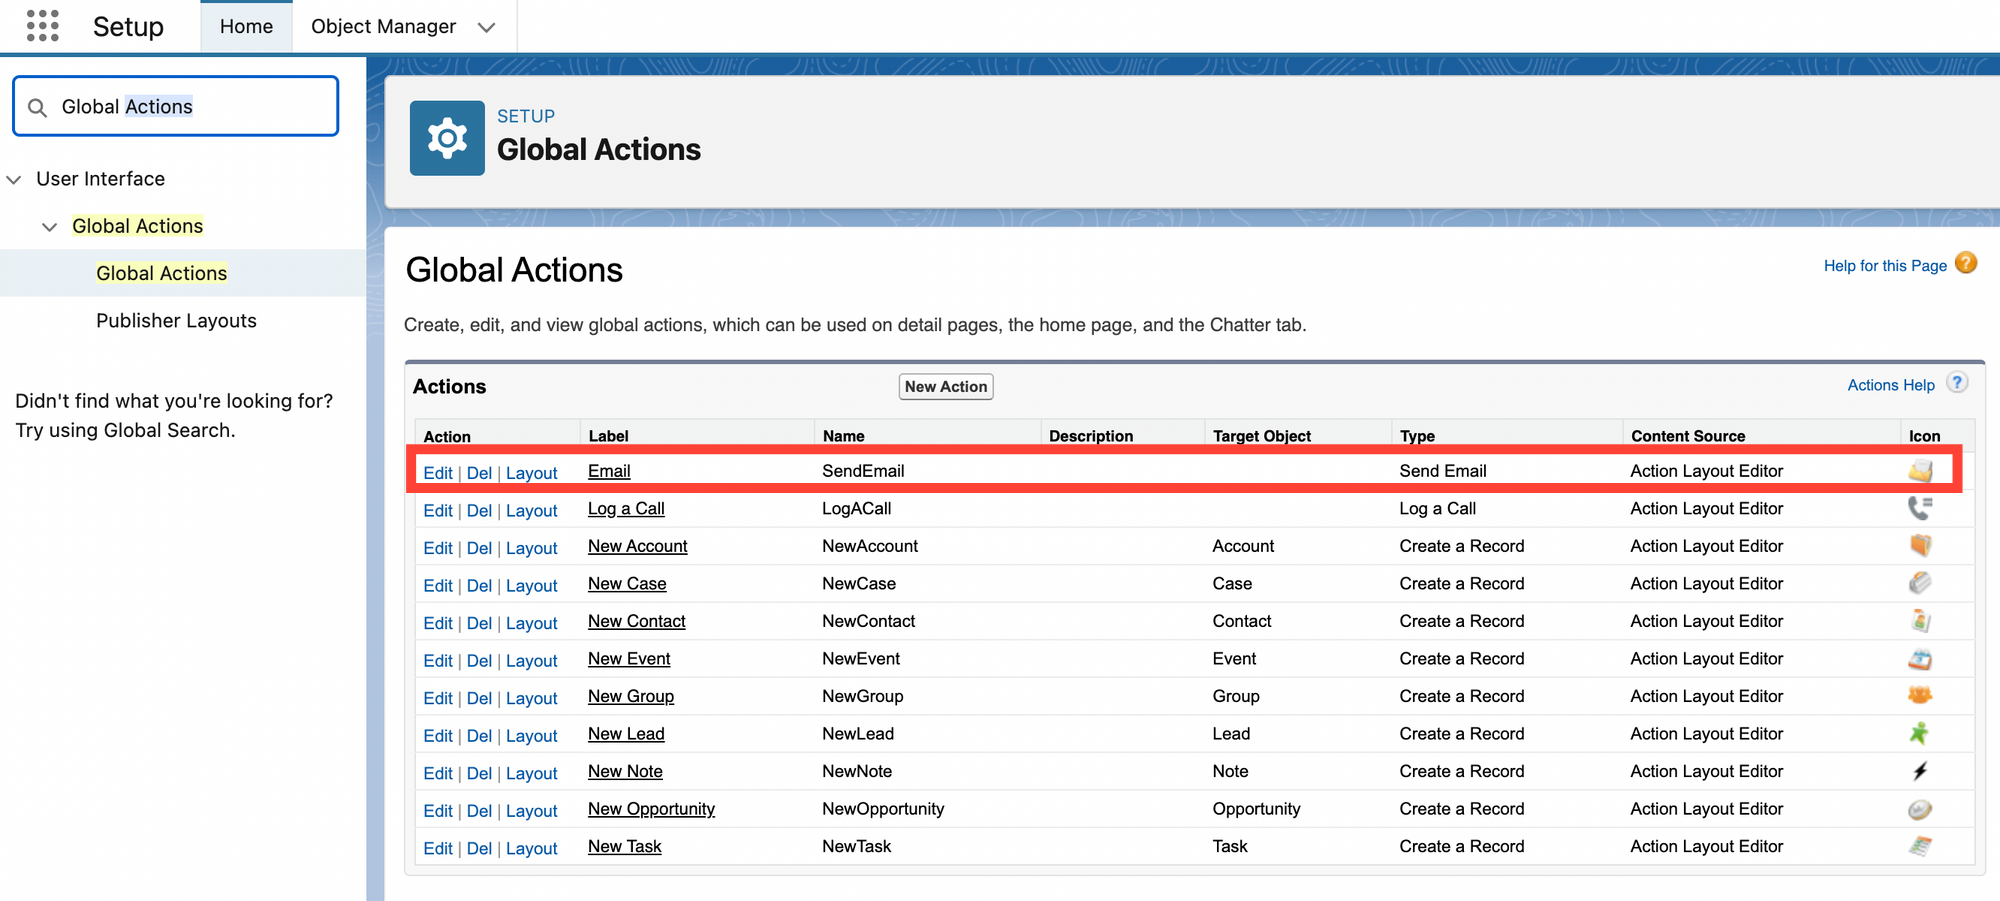
It shows that "SendEmail" is already present. This means that there is a global action for sending emails, but it is not yet displaying on the main global actions menu. To change that, click on "Publisher Layouts" first, and then click on "Edit" in the following screen.
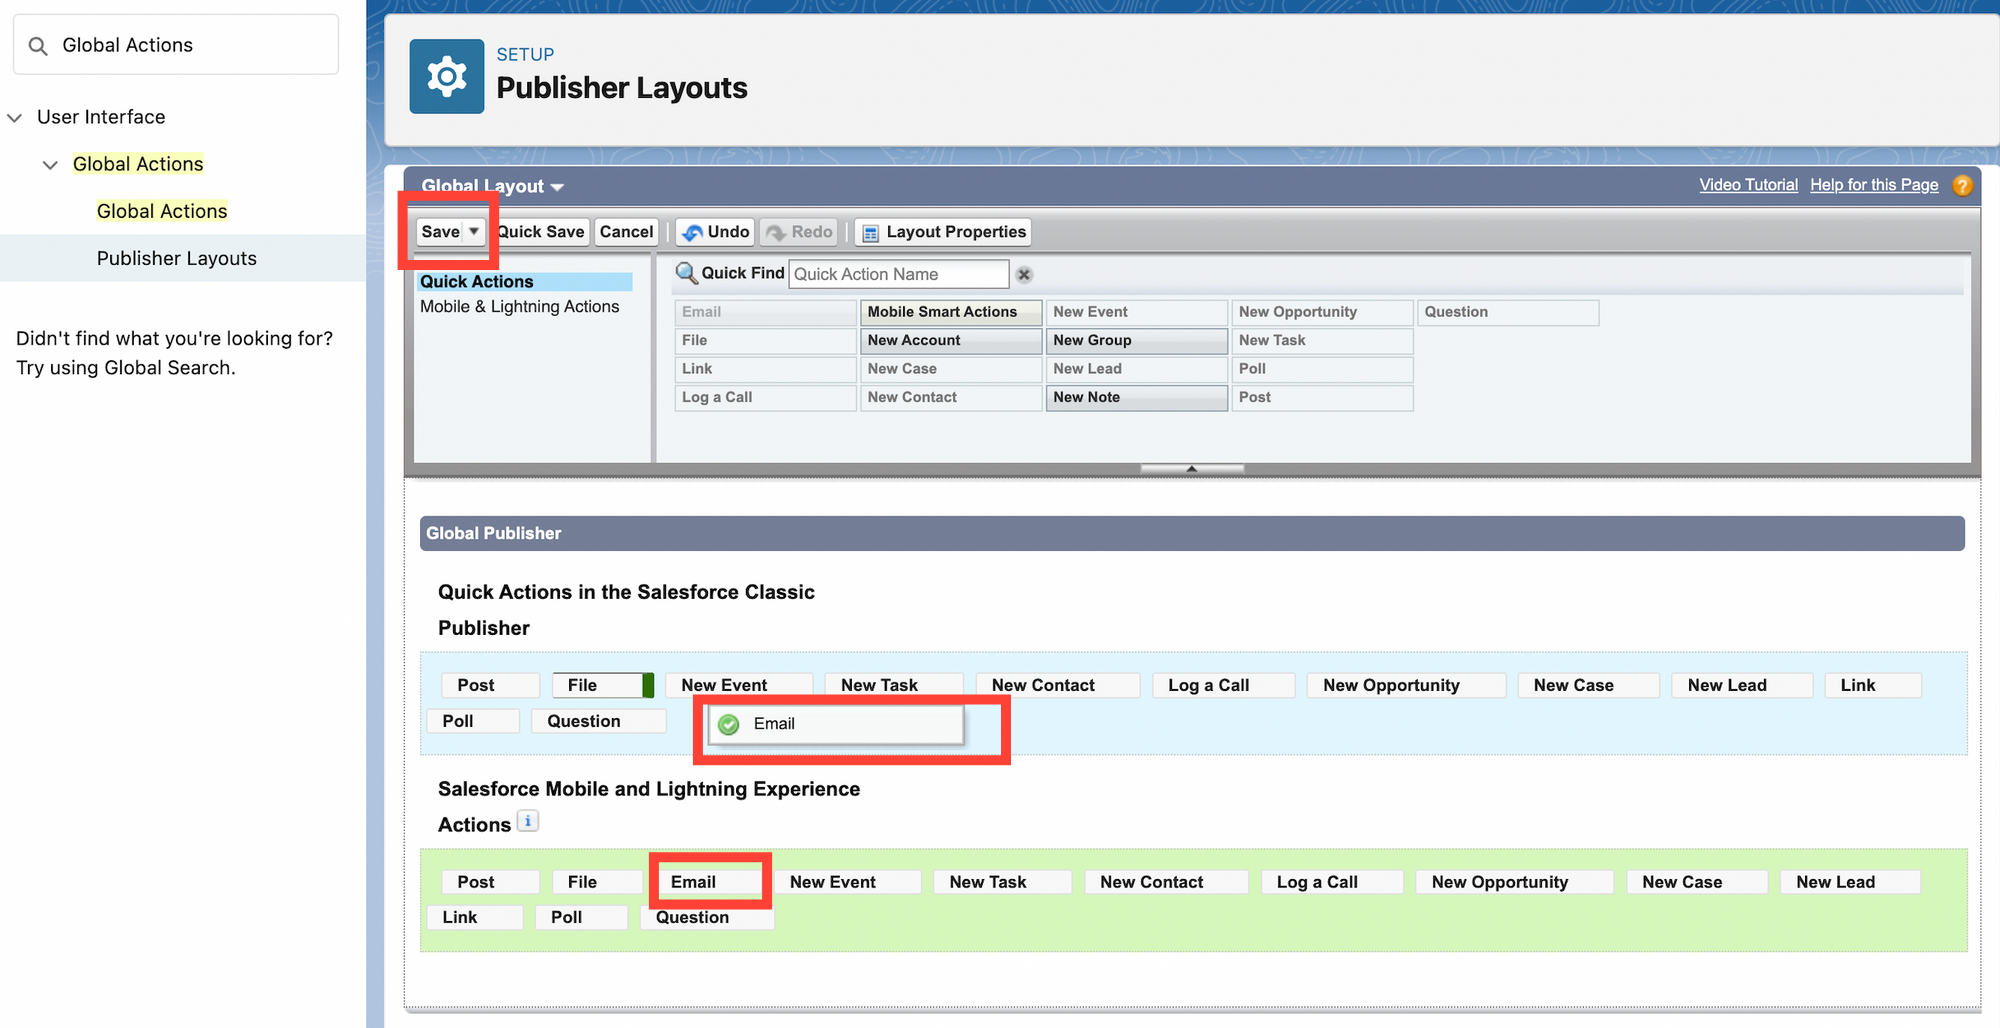
From this screen you can drag and drop the "Email" action to both the Classic and Lightning user interfaces. You can also rearrange the order of the global actions, and then once you click "Save", those changes will be updated. Now, when you visit the "Global Actions", you will see Email also available as one of the options.
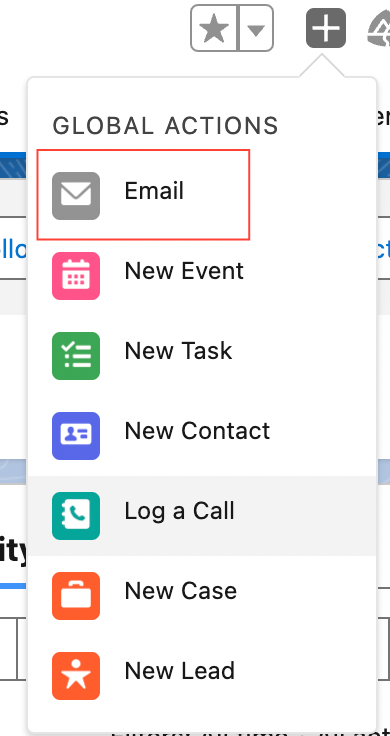
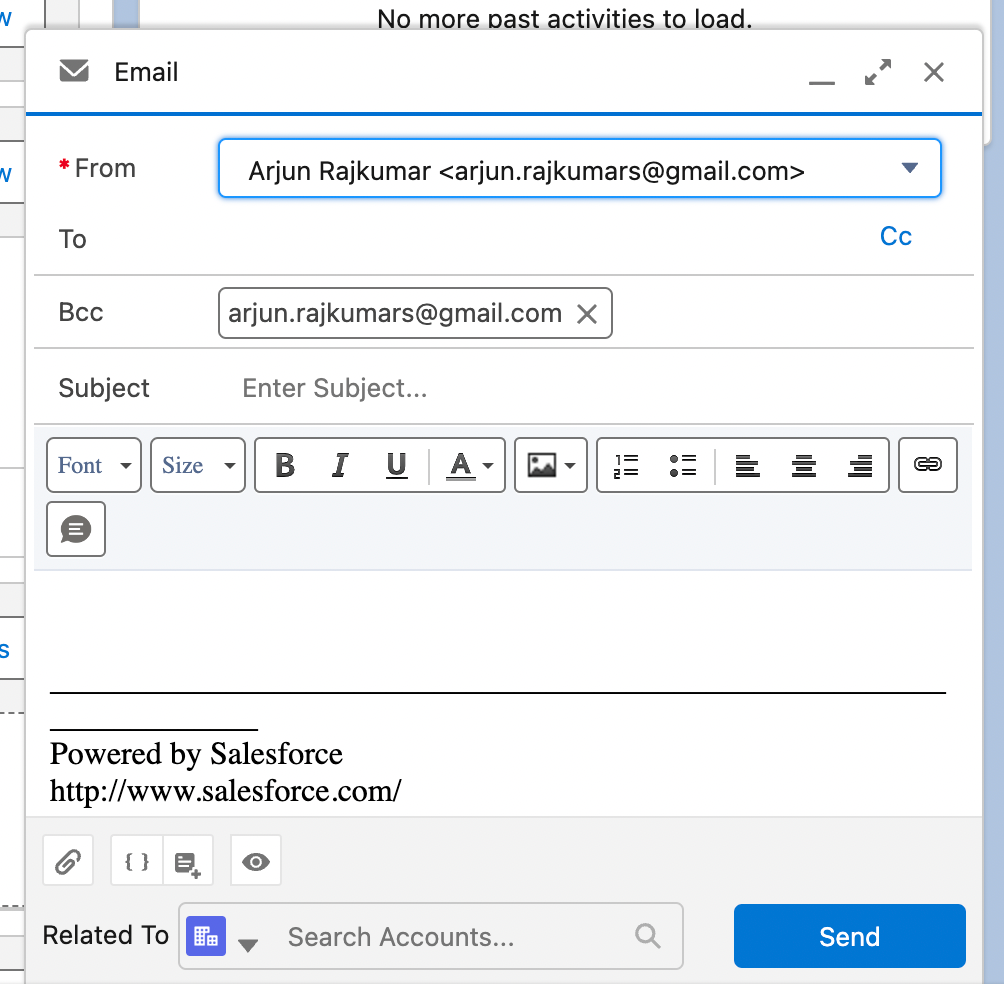
You can then send emails from any screen, by clicking on the Email icon on Global Actions. It will open a new modal, and allow you add the body for the email.
Global Actions are really useful as these are actions that you will be doing regularly, and it is good to add them by default. You can also add custom global actions - the detailed steps are shown in the chatGPT prompt shown before.
Admin: Viewing Audit Trails on Salesforce
Audit trails are useful for viewing the recent actions done by an admin. it shows the recent changes made to the setup, who made them, and the date it was made. To view audit trails, you can do the following:
- Click on the settings gear icon on the top right
- Click on "Setup"
- Search for "Audit Trail" in the search bar

Conclusion:
This tutorial looked at how you can use Salesforce as your CRM. There are many more features related to Salesforce, but we have covered all the important ones in this article - leads, contacts, opportunities, accounts, cases, global actions are more - which should help you setup your salesforce CRM effectively.
More resources:
